There is a separate XModules installer for Windows, Mac and Linux. The installer includes the latest FileAccess, RealUser Simulation and DesktopAutomation XModules. Their version numbers are:
The XModules work with UI.Vision RPA software for Firefox, Chrome, Edge and the Copyfish Free OCR addon. So if you use one or more of our extensions, you need to install the XModules only once.
We test on the following operating systems, but others should work as well. Please report any issues in the forum.
The XModules installers do not include the UI.Vision browser extension itself. You can download the UI Vision core module here: - UI.Vision for Chrome - UI.Vision for Firefox - UI.Vision for Edge License: End User License Agreement (EULA)
XModules never contact the Internet. The software runs 100% locally on your machine. This gives you 100% security and privacy.
(1) Just run the downloaded setup file, it takes care of everything (NO admin rights required).
To test that everything works correctly switch UI.Vision RPA to file storage mode.
(2) (Optional) You can customize the UI.Vision home folder location.
By default, UI.Vision RPA uses "
In some companies the download of EXE installers/files is blocked. If this happens to you, please use the ZIP file download link. To install from the ZIP archive, unzip the archive and then run "1install.bat".
(1) Run the downloaded macOS installer (admin rights required).
(2) (Optional) You can customize the UI.Vision RPA home folder location.
By default, UI.Vision RPA uses "
Sonoma/Ventura/Monterey/Catalina/Big Sur: Since the Catalina update (10.15) macOS has a very strong privacy protection. You need to explicitly allow the XModules to take screenshots and to control the mouse and keyboard of your system.
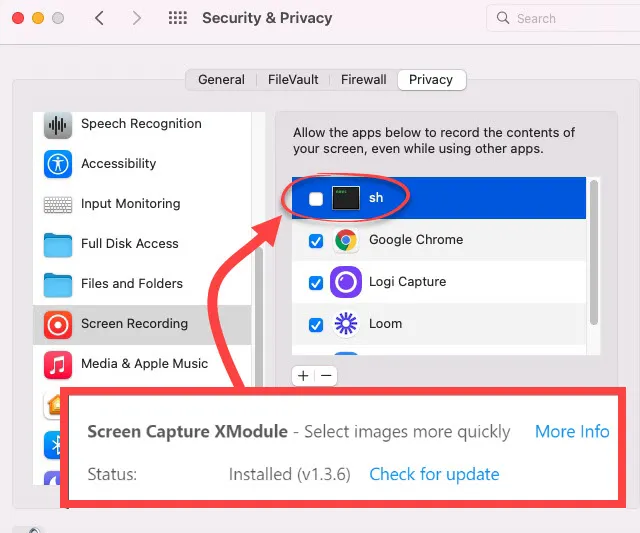
The first time you use a realuser command (XClick, XMove, XType,...) your Mac will ask you to give "kantu-xy-host" and "kantu-cv-host" permissions. But it does this only once. If you missed the dialog the first time or denied the permission, future realuser commands will fail silently and you need to give the required permissions manually (as shown in the animation below). Optional: The first time you use the new "Screen Capture XModule" your Mac will ask you to give a file called "sh" permissions. We use this file to connect with the Mac's own screencapture software.
 The video post shows how to enable the XModules on Catalina and Big Sur. This is a one time task. Once these two XModules are allowed to run,
everything works fine. We are a registered Apple developer and the XModules are code-signed and notarized.
The video post shows how to enable the XModules on Catalina and Big Sur. This is a one time task. Once these two XModules are allowed to run,
everything works fine. We are a registered Apple developer and the XModules are code-signed and notarized.
Optional: If you use the new "Screen Capture XModule" your Mac will ask you to allow the "sh" file to run. We use this file to connect with the Mac's own screencapture software.
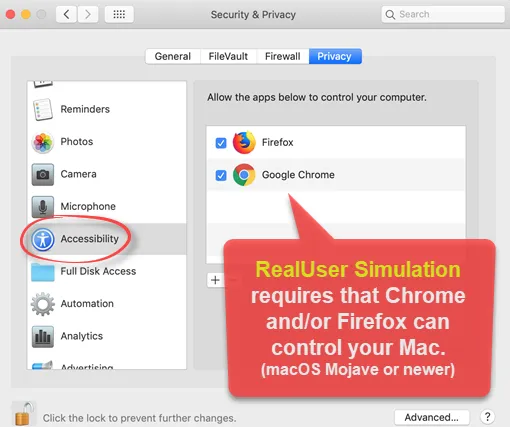
macOS Mojave: The Mojave security is not as strict, but still: All apps that can control the mouse and keyboard - like the UI.Vision RPA RealUser XModule - need explicit permissions to do so. To add these permissions, go to Settings > Security & Privacy > Privacy > Accessibility option and add allow Chrome and/or Firefox to control your computer (Mojave only! - for Catalina and Big Sur see above). Since UI.Vision RPA "lives" inside the browsers, the browsers are the apps that need to be added to the accessibility dialog. The FileAccess XModule does not need these permissions.
The installer is provided in the modern AppImage format:
(1) To install, make the AppImage file executable and click on the AppImage. This runs a script that makes all required settings. This is all!
No root permissions are required.
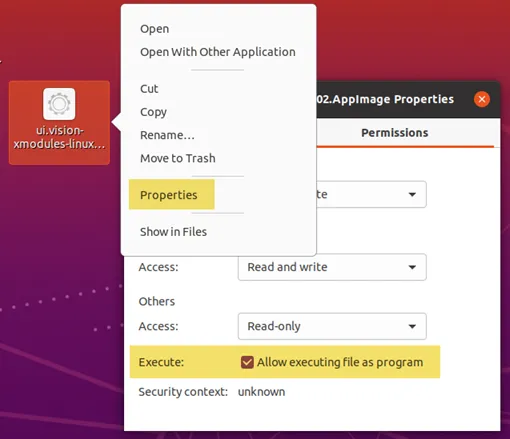 Screenshot: How to make the AppImage installer executable after download.
(2) (Optional) You can customize the UI.Vision RPA home folder location. By default, UI.Vision RPA uses "
(3) (Optional) For desktop screenshot creation on Linux, UI.Vision uses (calls) the Shutter screenshot tool. If Shutter is not installed on your system, UI.Vision prompts you to install it.
For some Fedora (Wayland) specific information please see XModules Fedora Support.